How To Build Wordpress Site
A Beginner's Guide
This tutorial will show you how to install and build a self hosted WordPress website. “Self hosted” means the WordPress site is located at a web host and not at www.wordpess.com
It is assumed that you already have a domain name (website address) and a web hosting account ( a place on the internet for your site to reside so people can see it). Need More Info
Installing Wordpress
Some web hosts offer a web hosting plan that is already set up for Wordpress but it costs more. Wordpress can be installed on just about any hosting plan and this tutorial will show you how to do it with just a few clicks.
Log into your web hosting cpanel using the following information you received from your web host:
- your cpanel url
- your cpanel username
- your cpanel password
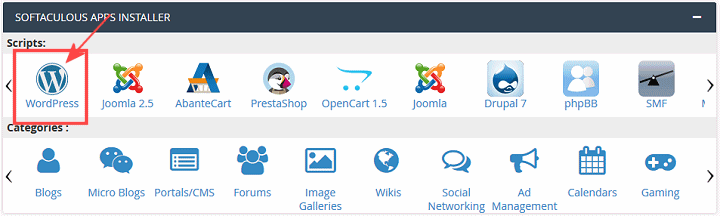
In the cpanel you will see a bunch of icons, scroll down until you see the WordPress icon, click on it and select “Install”. ( If you don’t see it find either the Softaculous or Fantastico icon to get to WordPress).
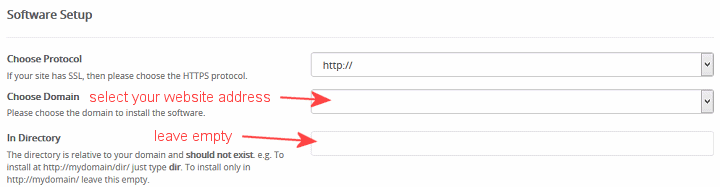
Select your domain from the dropdown menu and leave the Directory text box empty (by default it has “wp”, delete it):
Enter your site's name and description.

Make a username and password for logging into Wordpress, if it asks you to choose a theme, make a selection, ignore the other stuff and click “Install”.
Once installation is complete, log out of the cpanel. Test to see if WordPress installed by typing your web address (domain) in the browser. If you see a Worpress page templete, installation was a success.
A few minutes after installation you will receive an email saying WordPress has been installed. This email contains the ADMIN URL you use to log into the Worpdress dashboard with the username and password you made during installation.
You're all set to begin building your website, so let's get to it.
WordPress Dashboard
The WordPress dashboard is where you build and edit your website, To get into the Dashboard go to the login page with the ADIM URL you received and enter your Wordpress username and password.
Setting The Home Page
Don’t worry how your site looks at the moment, right now you just want to make your home page. The home page is what people will see when they type your site's web address.
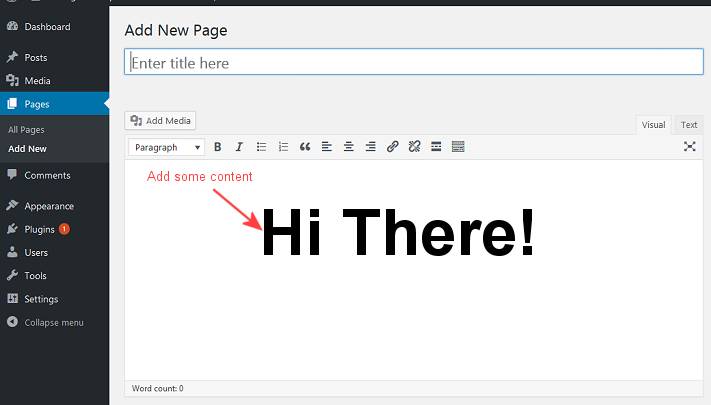
Hover over Pages in dashboard sidebar and click Add New. Give your page a name, any name and add some content such as a couple of words:
If you want your website to also have a blog add another new page and name it “Blog” or something like that but this time don’t add any content to it, the blog page will act as a placeholder for your blog posts.
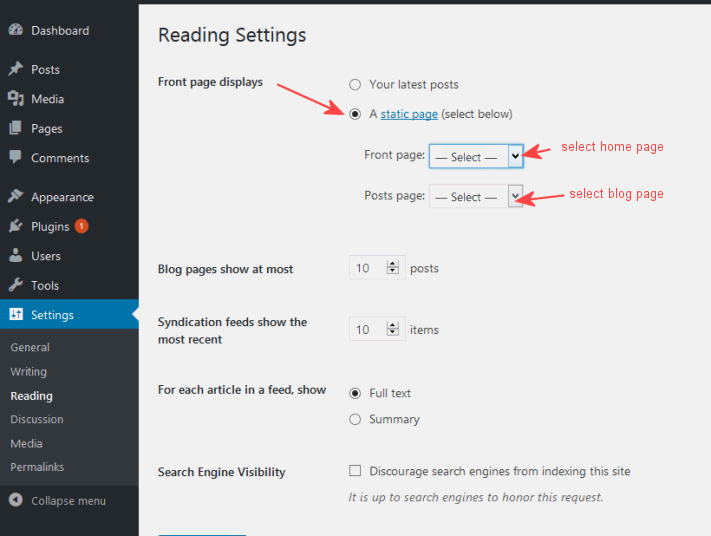
Next go down to Settings in the sidebar and click Reading from the flyout menu. Select A static page and from the Front page drop down box choose the page you just made for your home page.
If you also made a blog page select it from the Posts page drop down box. Click Save settings button:
Navigation Menu
All pages that you make will appear in your site’s main navigation menu, to hide a page from the navigation you will need to replace the default main navigation menu by creating your own. Relax it’s easy as you are about to see.
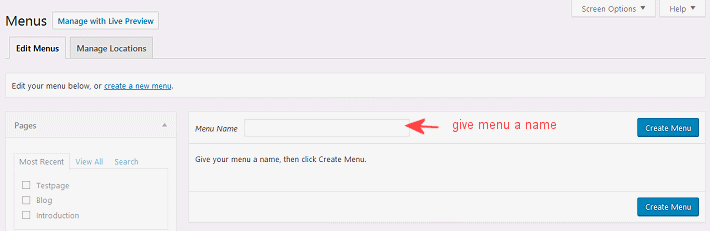
Hover over Appearance in the dashboard sidebar and click Menus then the “create a new menu” link. Give your navigation menu a name, any name and click "Create Menu" button.
Select the pages you want appearing in the navigation and check the box that says Main Navigation (primary menu). Click Save Menu button:
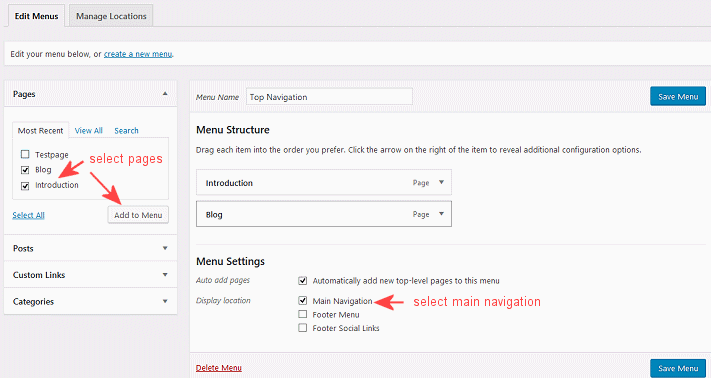
Congrats, you have just created your main navigation menu! You can rearange the order of the pages by dragging a page tab up or down. To remove a page from the navigation menu click the down arrow on page tab to display the "remove" option:

Note, removing page from navigation menu does not delete the page, it only hides it from the menu. If you want to delete a page go to Pages > All Pages and hover over page to reveal more options.
Customizing Your Wordpress Website
Selecting Themes
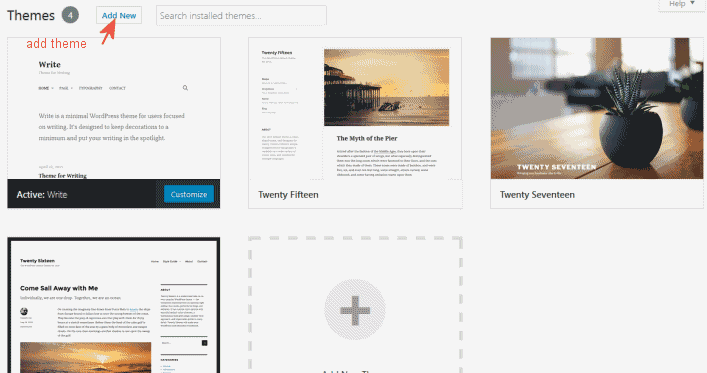
Themes are customizable website templates to make your site look nice and pretty. To select a theme go to Appearance > Themes in the dashboard sidebar. If you don't see much of a selection no worry, you can download and install a theme you like from the many places that sell Wordpress themes and even offer them for free such as the official repository at wordpress.org/themes .
To install a theme first download it to your computer and then click the Add New in the themes section of your dashboard:
Once the theme is installed it appears in the themes section and you can select it if you want to use it for your website. You can change themes anytime, it won't affect the content of your website, only changes the look.
Customizing Themes
All Wordpress themes can be customized so you can have a website as unique as you are. The type of customization available depends on the theme being used. Play around with the customizing options available under the Appearance tab in the Dashboard sidebar and have fun building your site!